Pages

Saturday, March 31, 2012

Nail Mail and another Polish Haul

On my way home again from work, I decided to hit the discount beauty supply store again for some more $1-$2 polishes.  I was not disappointed! $26 dollars later, I had 16 new bottles of polish. 


When I got home, I had my Julep Maven box for this month waiting for me as well!


This month I went with It Girl because Niecy speaks to me and Penelope and Annette are perfect pastels for Spring!  On top of the polishes, Julep sent toe separators and chocolate eggs!  So glad I joined Julep!


I did get my polish fix for now but as most of you know from experience, it doesn't last long.  Can't wait to use some of these awesome holos, chromes, pastels, shimmers, glitters, and cremes!

Monday, March 26, 2012

Metallic Gradient Nails

I do love a bit of shiny polish plus I've be enamored with Orly's Space Cadet since I bought it a few months ago so these nails just sort of happened from playing around with metallic polishes and a small nail art brush!


 After painting two coats of Space Cadet, I painted thick Metallic Aqua lines at different points across each nail.  I used a small nail art brush to smear the Aqua lines and make them whispy.  I then added Ivanka on both sides of the Aqua lines with a nail art brush and blended them in. 

Sunday, March 25, 2012

Week 13 of the Year of Polish Challenge: Purple Holo Ruffian

I am so glad that I chose to do the Year of Polish Challenge because its really encouraging me to try new designs and techniques.  This week's challenge is Ruffian manicures.  Of course, I went with my two favorite polish colors...purple and grey!


Love the Holo polish on top:) 


Saturday, March 24, 2012

How do I love thee...

I just wanted to take a little time out to say hello and, more importantly, thank you to my small group of followers!  I love knowing that someone out there is reading these little, zen moments of polish expression. 

I will be doing a giveaway again soon to celebrate 100 followers so tell me what YOU would like a chance to win.  Polish collections? Specialty polishes?  Indie Polishes? Nail art? Nail Art Supplies?  Image plates?  I'm open to anything nail related!

Also, tell me what you would like to see in the nail art!  Sound off in comments.

Remember...

Keep Calm
    and
Polish On!

XOXO,
Char

Friday, March 23, 2012

Couldn't Resist: Hunger Games Flame Nails

A friend and I are heading to see the Hunger Games tomorrow night so my nails MUST match the theme of the night!   I've been seeing all kinds of flame nails but I wanted to try the waterless marbling technique to make the flames.


So for these nails I prepped my nails with Pro FX Complete 3 base coat.  I then painted the outline of my nail except for the edge in a thick coat of Secret Admirer, followed by a thick arch of Ruby Slippers, and followed by a thick half moon and free edge painted with Metallic Yellow.  I can't stress how fast you need to do the thick layers to make these nails work.  Next, I used a tooth pic to drag the yellow and red polish into flame shapes, wiping off the end of toothpick between each pass.  Once the nails dried a bit, I used Cha-ching to accent the red p

art of the flames and filled the middle of the gold part of the flame with Hue to simulate the light almost white inner part of a real flame.   These nails are really worth the work and drying time so be sure to cover them with topcoat!  My other set of nails will be painted with one coat of Secret Admirer and sport the words "May the-Odds Be- Ever in-Your Favor!" and "12"on my thumb!

Happy movie watching this weekend, lovelies!

Tuesday, March 20, 2012

First Day of Spring means Bluebonnet Nails!

One of my fondest memories of my grandmother that recently died was when I was very young.  My grandmother would take my sister and I on walks in the fields in front of their home in Texas during the spring.  My sister and I would pick handfuls of wildflowers including Indian paintbrushes and bluebonnets.  Yes, yes, I know that bluebonnets are the state flower however, try to reason with a five year old!  We'd bring them back to the house and put all the flowers in mason jars and drinking glasses.  My grandmother was an avid gardener and always had rose bushes and ivy growing.  She loved teaching my sister and I about growing things. Anyway...I have been seeing friends and family post bluebonnet pictures on Facebook and got a little nostalgic so I decided to paint some Bluebonnet nails.  Major plus is that Spring is upon us! 

The first thing I did was to search online for some bluebonnet paintings and found Niki Gulley.  Her Texas wildflower paintings are sooo gorgeous that I modeled my wildflowers after hers!

Next, I had to test out my techniques.  When you do elaborate nails with layered backgrounds you do not want to experiment on your nails.  I practice my designs on dollar store note cards.


You get the idea.  Luckily, most of my nails art tends to turn out better than the test but these look pretty good.  One thing I knew to avoid was the "grape clusters" look when doing this on my nails.  The learning is all in the test!

Then I tried the design out on my nails. The first is with a lamp light and no flash and the second is with flash.
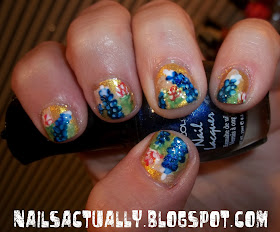
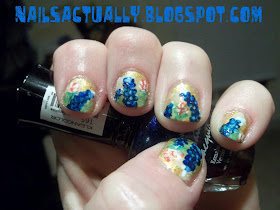


So how did I do these nails? Very carefully!  I started with base coated nails and did one thin coat of Metallic Yellow.  I then sponged on random spots of Snow Me White.  Next I filled in some of the white background with sponging in Unicorn and Venus.  Once the background dried, I sponged on a thin green haze at the tip of each nail in San Francisco.  Using a nail art brush I made bluebonnets with dots of Metallic Sapphire.  I then filled in the middle of each bluebonnet with small dots of Rain Check.  Using a smaller nail art brush, I made the bluebonnet tops with dashes of Snow Me White and added dots to each bonnet.  For the Indian Paintbrush, I made ovals in Thimbleberry and accented the petals with more dashes of Snow Me White.  I used more San Francisco to add stems and leaves to the paintbrushes and highlighted the leaves with the lighter green Olympia.  To protect my art, I painted over each nail with a top coat.  I have to say that these are some of my favorite nails to date.  For my Texas peeps, keep on posting the glorious spring wildflowers.  With all the rain Texas just got, there should be tons of bluebonnets and Indian paintbrushes to take in!

What do you think?

Monday, March 19, 2012

Week 12 of the Year of Polish Challenge: Pastel Skittle Manicure

I am excited that the Year of Polish Challenge forces me to sit down and do all of the manicure I have on my extensive list to try!  This week's challenge is a Skittle Manicure.  I love all the pastel skittle manicures out there so I did one of my own.


Sunday, March 18, 2012

March Polish Haul

I have been passing by this discount beauty supply place for months on my way to work and I finally got a chance to go in there to see what kind of polish they have.   I was not disappointed.  $12 and some change later I was the pleased owner of several new bottles of polish.


Today I also dragged my husband to a flea market and found two vendors that had $1-$2 polish bins.  I spent $17 for the polishes and cuticle cream below.


So 20 polishes and some cuticle cream for under $30!  Now where to put them...

Friday, March 16, 2012

Green Snake Nails

I recieved some great nail mail yesterday from Cheeky Beauty via Amazon.  I bought one of the Jumbo nails plates and 26 image plates.  My image plate collection is really starting to grow!  I have Konad, Cheeky, Bundle Monster, Red Angel, and an unnamed brand of plates.

The jumbo plate is full of snake skins and other interesting prints so I broke out the stamping equipment for some Saint Patrick's Day Green Snake nails.

First I had to test color combos!


I started with two coats of Innocent and then stamped on the image from Cheeky Jumbo Plate D using Julep's Leah.  I then painted an oval shape on my pinky nail with Snow Me White.  Once dry I filled in the oval with Let's Meet.  I then drew in the snake pupil with black polish and added shadow around the eye with Recycle.

These slithery, scaley nails are perfect for St. Pat's day without being rainbow, pot o' gold, and shamrocked!

Thursday, March 15, 2012

Week 11 of the Year of Polish Challenge: Saint Patrick's Day Nails Two Ways

I love the trend of a different design on every nail and used all of my nail canvas for this week's Saint Patrick's Day Challenge.  The first set of nails below is generally free-handed with french tip designs on the thumb and pinkie nails.  The rainbow design is accomplished using a watercolor technique.  I also used some glitter nail art balls for the "gold."


 On these nails, almost everything is free-handed except for the background of the middle finger which was stamped from a design on Bundle Monster plate 214.  The rainbow effect was made with quick dabs of polish.  I painted my ring finger nail with Metallic Yellow and while still wet I dipped the nail into the gold steel nail art balls. 


I really like the 3d effect that using the steel nail art balls make as gold coins in the pot of gold and as my accent nail on the other set of nails.  I am very happy with my early and cute Saint Pat's Day nails!

Monday, March 12, 2012

Metallic Fish Scale Nails

Since getting these Red Angel image plates, I have been wanting to use the scalloped design on my nails.  I was finally able to get around to using it and love the results. 


On top of a base coat, I painted one coat of Metallic Green and then sponged on Metallic Purple, Metallic Aqua, and Metallic Yellow.   Once dry, I used Black Creme on  RA plate 111 scale/scallop full nail image and stamped the image on each nail.


I am so in love with this image plate series and next time I might try a blue sparkly base instead since the aqua did not show up well on top of the green.  I also plan to make some Koi nails using this stamp with some oranges and whites:)  Stay tuned!

Friday, March 9, 2012

Week 10 of the Year of Polish Challenge: Minnie Mouse Nails

No surprise, I saw the Minnie Mouse graphic below while searching for some polka dot inspiration and decided I needed some Minnie Mouse nails!


Here is the finished product!


After prepping my nails with ProFX Complete 3 base coat, I painted on one coat of Ruby Slippers.  Next using a dotting tool, I made Snow Me White dots all over each nail except for the ring fingernail which I did a half moon formation of dots.  I also dipped a small nail art brush into Snow Me White and did a white background shape of the bow on the ring finger.   On my thumb nail, I free-handed a mouse head in Ebony Hates Chris.  I then painted over the white bow shape with Let's Meet and used Ebony Hates Chris to carefully outline the bow and add detail.  Last, I used a bit of Trixie to show the shape of the mouse ears on my thumb nail.  I topped it all off with another coat of ProFX Complete 3 for my topcoat.

I am lovin' these nails and this challenge!  Polka dots rule:)


Monday, March 5, 2012

Stormy Nails


For these I painted my nails with a coat of Aruba Blue then while wet painted a thin coat of Secret Admirer and then another coat of Aruba Blue.  I then used a nail art brush to dab on some White On in a cloudy formation.  I then mixed Luna, Recycle, and Secret Admirer and dotted the mixture over the white clouds.  Last, I used a small nail art brush and added lightning with more White On.  I plan to work on this design a bit more after looking at some paintings of storms.  Personally, the picture looks better than the nails actually turned out.    For me this was a nail fail if only because it doesn't match the picture in my head.  The key is to keep on trying.