Monday, January 30, 2012

Daisy French Tip Nails

I had an idea for nails with daisy chains but then thought these would be cute...and they were:)


These nails were easy and quick.  I gave each nail two coats of Thimbleberry.  I then used Snow Me White to freehand the daisy petals with a small nail art brush.  Next, I used Metallic Yellow for the centers of the daisies and finished with a top coat.

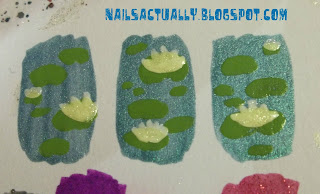
Lily Pad Nails

These nails were a bit of process that started out the night I did the Starry Night Nails.


I wasn't really thrilled with the test but I was hoping that the nails would turn out better than the test run.


To do these nails, I started off with prepped, base coated nails.  Next I placed dots of Austin-tatious Turquoise, Tokyo Pearl, and Why Not on each nail and used a toothpick to swirl the colors. Next, I used Metallic Green to freehand different sized lily pads and used Limestone to draw in accent lines around the lily pad.  Next, I used Snow Me White to freehand lotus flowers.  Next, I used Cream Pink to add some pink color to the lotus and placed some iridescent glitter over each flower.  Last, I topped them off with some ProFX Complete 3 topcoat.

Overall, these nails turned out more artistic than I planned and the only thing missing is come koi fish...ohhh, ideas!

Sunday, January 29, 2012

Late January Polish Haul..The best so far!

 A friend, her teenage daughter, and I had a crafty night last night that turned into nail polish madness. We went to Ulta and I bought the Austin-tacious Turquiose and Nicki Minaj Save Me glitter by OPI.  I also had to have Orly's Space Cadet.


 This morning I hit a local K-mart with my husband and we were quite taken aback with how abandoned the whole place looked.  But I was on a mission to see if I could get some of the Jordana glitters. 


While at K-mart, also picked up the above polishes.   The hard to find Gem Crush Lady Luck magenta and silver glitter.  All the displays I keep finding only have six of the Gem Crush colors.  I also grabbed a Jordana polish with glitter called Purple Glam.  Last, I grabbed two Milani glitters in Teal and Lavender.


Newspaper Nails Week 5 of the Year of Polish Challenge

What's black and white and "red" all over?  Newspapers, toerags, Captain Grimes, or if you used the NY Times...the "Old Grey Lady!"  I finally did some Newspaper Nails.  True, its simply because of this challenge but I've been seeing these all over the web and they were definitely on my need-to-try list. 

There are tutorials on how to do this all over Youtube so please check if you want to know how to do it.  Since I didn't have rubbing or drinking alcohol and water didn't seem to work I, um.. improvised!


Yep, this girl adapts!  I used astringent from my medicine cabinet:)


For these nails, I painted each nail with two coats of Skull & Glossbones.  After the nails were completely dry, I soaked each nail in the astringent for several seconds and then applied pieces of cut up newspaper.  I repeated the process with each nail and filled in the spots that didn't take with more newspaper.  To protect the newspaper ink, I coated each nail with Julep's Fast Drying Top Coat and then added a touch of SallyGirl iridescent glitter for some shine.

Pretty good for a first try! Can't wait to experiment more with this process:)

Saturday, January 28, 2012

Pink & Gun Metal Heart Nails

I did these nails just playing around with some pink and grey polishes.  Of course, Valentine's Day isn't far from my mind but after five years of wedded bliss, the honeymoon is over, I'm on a strict diet, and I dislike the wastefulness of cut flowers.  My husband is sweet throughout the year so one day doesn't make or break our romance!


These nails aren't great BUT in my defense, they were painted with my left hand (yes, I'm nuts like that) AND despite how messy they are I really love the Insta-Dri Gone Grey with the Wet N Wild Sparked Glitter. I think for Valentine's Day proper, I will wear just the Gone Grey with the Sparked Top Coat.  So pretty!  So yes...had my right hand not been full of lovely Julep polishes that formed some very sweet Peace Nails, this nail art would've been much better.  But, oh well! I still like 'em!


Friday, January 27, 2012

Symbols of Peace Nails

These nails are something I've been mulling over and finally sat down to do.   I do love my causes!


After prepping my nails with a protective base coat of Pro FX Complete 3, I painted three nails (thumb, index, and ring fingernails) with two coats of Julep's Amy.  I painted the remaining nails with two coats of Snow Me White.  Once polish was dry, I free handed a dove shape onto my index and ring fingernails in Snow Me White.  To add sheen, I glossed over each dove with Tokyo Pearl.  I used Black on Black for the single dove eye on each dove.  I then used Julep's Michelle, a fabulous navy, to outline each dove shape. On my middle and pinkie fingernails, I used Golden-I to freehand the olive branches. Using Julep's Selena, I drew in a couple of oval circles for the olives.  Finally, I used Julep's Diane for the olive branch leaves and to outline the olives.   On my thumb nail, I used a nail art brush and gently patted on Snow Me White and Tokyo Pearl in a peace symbol shape to get the cloudy effect.  Once all the art was mostly dry, I covered each nail with Julep's Fast Drying Top Coat. 

I love how these turned out, especially my doves.  Unfortunately, now "This is what it sounds like when the doves cry..." is in my head for the remainder of the night *sigh*.


Sunday, January 22, 2012

Brown and White Floral Nails

Let's face it, I gravitate towards flashy polish colors if my blog has anything to say about it but the Sally Hansen Insta-Dri Coco-a-go-go is such a pretty brown that I had to try it out today.  


To get this look, I applied two coats of Coco-a-go-go to my prepped nails.  I then applied one coat of Gilded Glitter.  I then used Snow Me White to freehand some white flowers on my ring finger. I then used Tokyo Pearl to apply some shine and Out of This World and Recycle to accent the flowers and stems.  Last, I used my Pro FX Complete 3 as a top coat.   These are some adorable nails that would work for alternative fall nails or with all the shimmer, some summery beach nails or toes.

Blue Plaid Nails: Week 4 of the Year of Polish Challenge

I was finally able to sit down and do some more nails.  Today marks week 4 of the Year of Polish Challenge which was Plaid Manis.  I decided to make use of two, beautiful Julep polishes that work well together along with some simple black polish. 


These are pretty straight forward.  I prepped the nails with Julep's Nail Therapy and then one coat of Julep's Amy.  Next I used Sinful Colors Black on Black to make two vertical black lines in different angles across each nails using a striper brush.  Next, I used Julep's Drew to add in the pink opposite lines and filled in each set of lines with the opposite color.  Last, I used Julep's Fast Drying Top Coat to protect the design.  I do love these colors and this simple, plaid design.

Friday, January 20, 2012

Ribbon Nail Fail

I have to show this nail fail not because its spectacularly bad but it does show how one can, um, overdo the nails.  Sometimes I just don't know when to quit.  Even so, the idea has good bones so I'll keep working on these!


Thursday, January 19, 2012

Asymmetrical Purple French Tip Nails

Just playing around tonight and came up with these ultra sparkly nails!


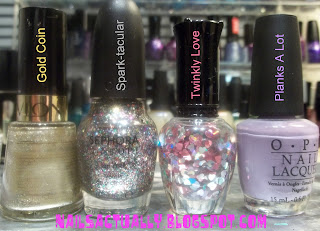
To get these I started out with clean, base coated nails.  I used a striper nail art brush to make a diagonal line in Planks A Lot from the top curve of one part of the nail to the lower side of the other nail. Once all lines were drawn I went back in with a nail polish brush and filled in the sections in Planks a Lot.  Next I used a striper brush to outline the top line in Gold Coin and started the diagonal line of the other gold section.  I then used a regular polish brush and filled in the rest of the gold section with Gold Coin, resulting in the nails above.


To add some sparkle, I used several coats of Spark-tacular top coat to the end gold section of each nail. I had the Twinkly Love confetti polish laying around and thought a small heart would be cute amidst the glitter so I added one to each nail.  Last, I used my Pro FX Complete 3 as a top coat.  I am in love with these right now and I'm thinking I should've gone bigger with the glitter!

Sunday, January 15, 2012

Van Gogh's Starry Night Inspiration Nails


When I bought Essie's Aruba Blue at the end of December, I knew that it would be perfect to try out some Starry Night nails!  A few days later, @lilysnailart tweeted about her Starry Night nails.  I replied that great minds think alike and Starry Nights Nails have been on my list since!

As usual for things like this, you should always have a reference to keep looking back to when you want to recreate art. 

I used this googled image:


Next, I prepped my nails with Julep's Nail Therapy as my base coat.  I have to say that looking at my first and later blog posts that my nails do look like they are growing better.  They certainly feel stronger too but I suspect its been from multiple efforts on my part such as not filing the sides of my nails, not biting my nails, not peeling polish from my nails as often, and trying to use a file or clippers when I have a snag.

After my base coat dried, I painted each nail with two coats of Aruba Blue.


Enough can't be said about the Aruba Blue.  It is crisp and clean and bright, the perfect back drop for Van Gogh's Starry Night masterpiece.  As to how I did these nails I start with small white brush strokes  in Snow Me White to start the clouds and outer circles of the stars and moon.  I then used Black on Black to draw in the whispy castle.  I used strokes of Why not on the clouds and blank portions of sky.  I then filled in each star and the moon with a circle of Unicorn.  Next I used Metallic Yellow to fill in the center of each star and the detail of the crescent moon.  I used a mixture of layers of swishes of Black on Black, Aruba Blue, Why Not, and Snow Me White to make the hill detail on the ring finger.  To bring out the outer sky, I added swishes of Snow Me White.  I then used Gone Grey to simulate the whisp of the castle and topped everything with Julep's Fast Drying Top Coat.

If you read yesterday's post, you'll recall that I practiced these nails on a note card first.


Sometime my practice card turns out better than the nails but I have to say that these nails are way better than the practice card!   I think these nails are a pretty darn good effort for a first try:)  Hope you like them and attempt them too!

Color Block Manicure: Another Year of Polish Challenge

While trolling for great shoes recently, the following darlings caught my eye....


I knew that I had a Color Block Manicure coming up for my next Year of Polish Challenge and I loved these colors together so with a little extra bling, I put some nails together inspired by these shoes.


To do these nails, I first applied Julep's Nail Therapy as my base coat.  I then applied two coats of Grey Suede to each nail.  Next, I used Kiss Black Striping Polish to make thin, relatively straight lines on random parts of my nail and used Black Creme to fill in the black shapes.  I then used Mon Cherry for the red parts, using a striper brush to draw in the lines first and filled in the rest with the polish brush.  Most people would stop here...but you all know that I have to go that extra mile and it usually involves some glitter!

I used a nail art brush dipped in Cha-Ching! and traced over the red sections.  Last, using Glitz Gal, I covered the black sections in the same manner.  I like how the Gem Crush polishes not only tone down the color block but add that sparkle we all know and love.  Can't wait to use more Gem Crush glitter polish in my nail art!  More to come soon!


More Leopard Print Nails and a paper test

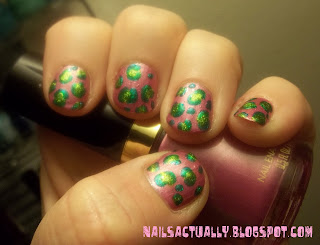
Just playing around with freehand leopard print tonight with a base color of Revlon's Extravagant. 
I decided to different print colors on each hand...


Last, inspired by my recent acquisition of Essie's Aruba Blue, I'm working on Starry Night nails.  Curious how it will translate to my actual nails!