Saturday, December 31, 2011

2012 Aqua Holo Glitter Nails -- My last post of 2011

I hope all you lovelies have a great end of 2011 and start off 2012 with positivity, energy, and love!  I've already posted some 2012 nails but with Julep polishes arriving today, my nails screamed for an NYE celebration. 

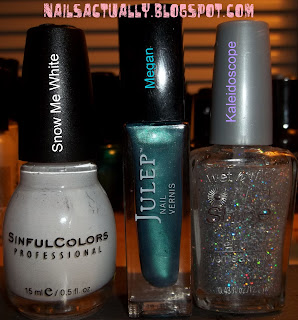
Out of the three new Julep polishes, I chose Megan.  I am a sucker for blue, aqua, and teal polishes and Megan is not only shimmery aqua but very pigmented so two coats turned out beautifully and covered my nails with ease.  Check out my swatch...


As you now know, I simply cannot stop at just polish so I did a sponge applied glitter gradient using Kaleidoscope.  I then drew in 2012 on my four main nails in Snow Me White with a nail art brush.  Last but not least, I used Julep's Fast Drying Top Coat to seal it all in!


*Tip* Putting on a top coat not only protects your glitter or nail art but I find that it takes away some of the roughness that glitter polish can produce on your nails.  You don't want to walk around feeling like you have sand paper on your nails, right?!  Use a top coat and smooth out those tips!


Happy New Year, folks!

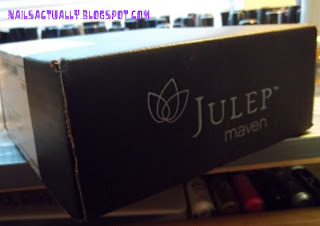
January Maven Box Arrived!

Just want to warn you ahead of time that this post contains a crazy amount of photos but I wanted you to experience what I do when I get my monthly Maven box!  If you don't subscribe to Julep's Maven program, consider getting on their mailing list for offers at least! 


First up is Julep's Nail Therapy.  This was a bonus freebie to the first 5000 Mavens as a thank you.  I chose this bonus because it specifically says "Hydrates and protects dry, brittle, peeling nails. Nourishes nails with Vitamin E. Dramatic results in just three days" in the product description on Julep.com.  My nails do tend to peel and I will let you know the results.  I am hoping for stronger nails!


Now onto the polish!  I have to say I was torn between getting my usual American Beauty choice or the It Girl selections this month but I am a sucker for more polish and I don't have colors like these.

Hayden is a very peachy color.  I'm not sure how often I will break her out as a full on nail color but its nice to have for nail art!

Megan is a shimmery blue that does match a few other polish colors but you can't go wrong with the quality of Julep's polish. 

Leah is my FAVORITE.  She's a shimmery bright green and I can't wait to get this color on my nails.

Fashion bloggers and magazines alike are all predicting that one of the beauty trends of 2012 will be Bright Nail Colors so those of us in the know are getting a great start with these three polishes!


Last, I had to post a picture of Jane's Beauty Tip that showed up on the bottom of my Julep postcard.  I do most of my nail art at night and overnight smudges are a common occurrence for me so this tip is something I think everyone should know.  I will be trying it and thanks, Jane!

Friday, December 30, 2011

Tarnished Copper Nails

I was inspired by last night's successful Purple Copper Gradient Nails.  I loved how Warm & Fozzie's copper tones played well with the iridescent glitter and thought "tarnished copper."  I've always loved seeing oxidized copper roofs of old buildings and the occasional tarnished penny.

I found the image below online to help me get the texture of the oxidation just right:


The picture below was take with a flash. Most of the time my flash pics do not turn out well, especially with shimmery or glittery nails but I like out the flash worked in this one!


So the base color I was going for was that of an old penny however, while Warm & Fozzie has great copper tones it doesn't have solid coverage being a micro glitter polish.  One of my most recent polish purchases was Coco-a-go-go which is a shimmery brown with copper undertones.  I swatched it and it worked perfectly with Warm & Fozzie to create the old penny color.  After prepping my nails with a protective base coat, I applied one coat of Coco-a-go-go to each nail.  After the polished dried, I applied a thin coat of Warm & Fozzie to each nail.  Using a cosmetic sponge, I sponged on the tarnished spots with For Audrey and layered more with Savage and the unnamed Bon Bons shimmery blue.  I also added Treasure Island's teal glitter and some iridescent glitter to add some sparkle.  One final coat of Julep's Fast Drying Top Coat and taadaa! Tarnished Copper Nails!

2012 Resolutions and Purple Copper Gradient Nails

With the new year almost upon us,  I thought I'd list my five main resolutions for 2012 (trust me, its related to these nails).

1.  I'm going to limit my personal spending to $20 per week.  I've gotten into a really bad habit of ordering things off amazon and I'm trying to curb that habit.  Personal spending is just Sonic teas, gum, and whatever else catches my fancy.  I think I can...

2.  I'm going to try and organize all of my polishes/nail art supplies/mani-pedi items and bring some order to this small corner of our apartment.   While re-organizing my polishes by color today, I found Julep's Alfre and started playing with this shimmery purple polish.  Hence the nails today!  Must get polishes where I can see all the colors and USE them!

3.  Do a better job at keeping in touch with friends and family back in Texas.  We all get caught up in our lives and its easy to pick up a phone and call someone.   I plan to do that more.

4. Be more daring and creative in my nail art.  I plan to scour the web come fashion week for the latest designs to go on my nails.  My nails and nail art WILL be more edgy and now.

5.  Make "A's" in grad school.  For those of you that haven't read yet, I just got accepted into a Master's of Library and Information Sciences program.  In two years I will be a Librarian with cool nails:0)

So onto these nails...


For these nails, I prepped with my usual Pro FX Complete 3 base coat.  Next, I applied the first thin layer of Alfre on each nail.  Alfre is a sensual, smoky purple that shimmers with depth.  I then applied a second thin layer of Alfre and let all nails dry.  Using a cosmetic sponge, I applied a heavy layer of Warm & Fozzie along the edge of each nail and then used the remaining glitter on the sponge to create the gradient effect.  Warm & Fozzie looks copper but has some pink and orange tones that work nicely with Alfre.  I actually put these two polishes together by happy accident and was enthralled.  Not to be outdone, I added the barest swish of some Sally Girl Irredescent Glitter polish on each nail which added some turquoise specks of glitter.  This effect reminds me of oxidized copper and I plan to do more with it.  Last, I applied Julep's Fast Drying Top Coat to seal in all that glitter and goodness!

Hope you like these Purple Copper Gradient Nails!  I can't wait to see what they look like in natural sunlight.

Be on the look out for a post and perhaps even a video showing my organization efforts!

Thursday, December 29, 2011

Post Christmas Target Polish Haul

I had to go to Target to return some merchandise and buy a gift card for friends so I passed by the beauty aisle and found some great deals.


Target had Sally Hansen's Xtremewear polish on sale for about $2.50.  Essie was on sale for $7 and some change.  I also scored the hard to find Mint Apple for a little under $2.  Last but not least, the steals of the day were the Insta-Dri polishes in shimmery Cocoa and Bronze that had clearance stickers with a $2.82 price tag.  I can't wait to use Aruba Blue in some ocean themed waterless marbling.  Hope your Christmas polish haul is as fortunate as my own!

Grey Glitter Rose Nails

One of my favorite things to wear is a black, cotton, 3/4 length sleeved shirt that has grey and ash colored roses.  I finally got around to recreating the print on my nails!


As usual, I protected my nails with a clear base coat.  After using a clear base coat for months, I can honestly say that a base coat really helps polish last longer.  I then applied a thin coat of Raven to the free edge of each nail to seal the edges and administered two, thin coats of Raven to each nail.  After each hand dried, I used my largest dotting tool to add uneven dots with Recycle in different sizes to each nail in a random pattern.  When the dots dried, I used a small nail art brush to apply the detail lines of the roses in White On and Skull and Glossbones.  Using the same brush, I added leaves with Recycle. 

The design looks fine as it was but I wanted to add just a bit of color to break the monochromatic theme with these nails. To bring out the leaves, I applied some Call You Later glitter and Ivanka to each leaf.  To highlight the roses, I added Kaleidoscope glitter to each rose.  I finished with a fast drying top coat and now my nails have an antique, almost gothic quality with this design.


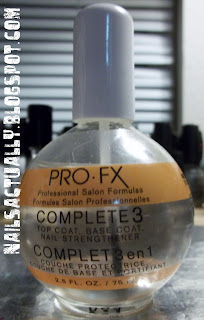
Below is my current base coat product.  It's triple threat being a base coat, top coat, and strengthener in one.  I tend to use Julep's Fast Drying Top Coat as my top coat because I think it helps my polish set and dry faster.  I had to switch products because my base coat kept peeling and chipping when I used Double Duty and Hard as Wraps for base coats.  Pro FX is easily found at any Walmart beauty section and I recall I only spent about $5 for this large, 2.5 oz. bottle.  Try it out and I doubt you'd be disappointed!

Tuesday, December 27, 2011

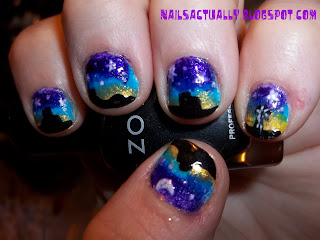
New Mexico Sunset Nails

My husband and I made a last minute decision to drive to Texas for a very short visit with our North Texas families last week.  On the way back home through Hwy 287 last night, we ran into an amazing sunset with golds, oranges, blues, and purples.  The moon was a clear crescent and there was a single star right beside it and the landscape of mountains and abandoned farms set black in the background.  I thought what a great set of nails the scene would be.


First, I did a Snow Me White base color over a clear base coat.  I then applied Metallic Purple with a cosmetic sponge at the top of my nails.  I then applied Brisk Blue as my second gradient color and Metallic Yellow as my last gradient color.  I then used Raven to draw in the shadow landscaping at the base of each nail including a lone windmill on my pinkie nail.  I used some more Snow Me White to draw in a crescent moon and stars in the sky.  Last, I applied bits of Luna to the stars and moon for a little bit of sparkle and gave each nail a protective top coat of Julep's Fast Drying Topcoat.

If you ever find yourself on Hwy 287 between Raton, NM and Clayton, NM be on the lookout for some of these shapes and try not to miss the sunset!  I am especially proud of my little windmill...

Some New Polish came in...

My good friend Jaime and her two little girls gave me some really cute polish for Christmas.  I received the OPI Muppettes Mini polish set and an e.l.f set of glitter and sparkly polish.  I will post about the e.l.f. polish at a later time but I had to post the OPI minis.  They are so adorable!


I also finally received my order from NerdLacquer on Etsy.  I ordered All Of Time and Space a couple of weeks ago after falling in love with it.  NerdLacquer currently doesn't have this color posted in her Etsy shop but I encourage you to contact her if you are interested in her handmade polishes.  


Friday, December 23, 2011

McQueen Inspired Shattered Turquoise Nails

Alexander McQueen's designs always pushed the envelope and I was so sad to hear that he took his own life in 2010.  I do hope Sarah Burton and her team will continue to design in the spirit of Alexander McQueen and pull off gravity defying, fashion forward creations to inspire me in my nail art. 

The nail art below was inspired by a pair of shoes from McQueen's Spring 2010 collection which were tan, bootie-like heels, encrusted with gold tipped turquoise in an almost broken glass pattern. 


I think on longer nails you could almost pull off a reverse french tip effect and add pieces to the bottom of the nail like the bottom of this shoe but I have short nails so I stuck with the pattern at the top of the shoe.


These nails were a process.  After putting a protective, clear base coat with Pro FX Complete 3, I quickly applied dots of For Audrey, Tokyo Pearl, and Iceberg Lotus.  I used a toothpick to do some waterless marbling and pulled the colors into one another.  After the nails were mostly dry, I lightly sponged on Metallic Yellow on random parts of each nail.  Next, using a nail art brush I drew in gold lines to look like a shattered or stained glass pattern.  Last, I dabbed Warm & Fozzie into some corners of the gold lines to add darker shadows to parts of the shatter effect. 

I am loving the way these nails turned out and, ladies, remember: When fashion is too expensive, too painful, or just plain out there....try it out on your nails!

*Tips*  I think this look could have easily been created with sponging the same colors but as you can tell I'm kinda in a "marbling" phase.  For longer nails, I would start with nude tips so you can recreate the entire shoe's pattern.   Also, a smaller brush would work for more intricate shatter pattern but I like how bold the gold lines are on these nails.  You coul also try accenting the shadows with a heavier copper polish but remember less is more!  Last, be sure you have time to do these nails and you won't be disappointed!


Thursday, December 22, 2011

Betsey Johnson State Fair Print Nails

I love Betsey Johnson's wild and crazy prints and her State Fair print is no exception.  I'm not sure I would ever spend $178 on a one-piece swimsuit nor does any of Betsey's designs come in my size.   However, I can wear her prints on my nails with a little bit of work and some polish!

 Click on the State Fair swimsuit below to be sent to Betsey's website where she sales all of her fabulous clothing and accessories!


On these nails, I started with two coats of Raven as my base color.  I then drew in all the print elements such as the four differently shaped flowers, leaves, stems, and bows in Snow Me White.  After the white polish dried, I applied For Audrey, Let's Meet, and Lavender Creme to their respective flowers.  I used a white base for any design on a darker color so that the polish will show true color.  I used Happy Ending to color the leaves and stems and used more Raven to draw back in line detail for the white bows and flowers.  I then took a very small dotting tool to put in the black dots on the large white flowers and bows.  I colored the center of each flower with the colors shown in the print: black for the blue flowers, pink for the yellow flowers, and yellow for the pink flowers.  I also used the same small dotting tool to dot in the white dots on the black background.  Last, I drew in shadow accents on the flowers with complimentary colors and finished these nails with a quick swish of Fast Drying Topcoat.

While these nails are a bit time consuming, they turned out even better than I had hoped and rank in my favorites!

In the Year 2012 Nails

I did these nails very quick last night so that I could get to bed.  I have seen some awesome New Year nails already but I wanted to have the Times Square Ball on my nails with a sparkly 2012.  Below is what I came up with...


These nails are pretty straight forward.  I started with a black base color and painted on gold "2012" numbers on four nails.   I then used a silver micro glitter polish to draw in the ball on the thumb nail.  I took sparkly fuchsia, blue, and purple polishes to put multi-color dots all over the ball and used more silver polish for the bright sparks around the ball.   Last I used the silver, fuchsia, blue, and purple sparkly polish to accent the gold numbers. 

Bring on 2012!

Monday, December 19, 2011

A Tale of Five Glitters Starry Nails and other news!

First and foremost, I want to say that it has been exactly one month since I started this blog and it has exceeded my expectations!  As of today, I've had almost 700 hits from the US and other countries around the world.  I love how small the world has become with the rise of the information age!  This is my 47th post and I look forward to tons more posts on nail art, nail polish, and everything in between. Thanks to my blog followers, twitter followers, and Facebook friends and family for making my new blog an absolute success!

In other exciting news, Zoya Polish recently had a two for one sale on their color boxes.  So for $24, I would score six Zoya polishes.  I couldn't pass that deal up!  I ordered the Classic Contrast and Spectacular Sparkle boxes and they arrived today!


The Spectacular Sparkle Color Box contains:
Ivanka--a sparkly green
Charla--a sparkly tropical blue
Alegra--a sparkly fuchsia
The Classic Contrast Color Box contains:
Raven--a inky, shimmery black
Trixie--a shimmery, silvery micro glitter
Luna--milky grey white with silver glitter

 Since I received all of the polishes above, I couldn't resist trying out Luna.  I applied several coats of Luna to my base coated nails and then started layering other glitters over to produce some starry, glittery nails.


After Luna dried on my nails, I added a coat of Party of Five Glitters.  I then added pink, gold, teal and silver star glitter from Siver Star and Star Glitter polish by swiping polish onto scratch paper and fishing out the star glitter with a toothpick and placing them randomly on each nail.  Last, I added a thin coat of chunky gold glitter.

 Luna and the other Zoya polishes are a happy addition to my growing polish collection.
Overall, these nails accomplished my goals...ease of application, quick, cute, and wildy sparkling.

Happy polishing!
Sunday, December 18, 2011

Sparkly Christmas Tree Nails with marbling

So bring on the cheese with these nails.  They are Christmas-y and Holiday-ish without shame...not to mention, Sparkadelic!  As I have said in previous posts, I have been playing with marbling when I stumbled onto a way to make a Christmas tree shape.  Dare you to try it!


Polishes Used:


After putting a clear base coat on my nails, I applied Metallic Green to every nail but my ring finger.  On that nail, I applied a thick coat of Sugar Sugar.   I quickly used a nail art brush to paint a thin line in Metallic Green down the nail. 

Here is the crucial step:  Dip your toothpick or needle into Metallic Green polish before you start your gradual horizontal marbling.  Stop midway and reapply some more Metallic Green to the pick or pin and finish.  Keep in mind that your zig zags should be getting bigger toward the end of the nail.

While the polish was still drying I applied a single glitter star from Siver Star glitter polish.  While the polish on your ring finger dries (its thick so it will take awhile) this gives you time to decorate the rest of your nails a la Christmas tree.  I first used several drops of Chunky Silver on my scrap paper and place the largest glitter pieces in swoopy lines on each nail to simulate garland.  This doesn't have to be that painstaking if you use a toothpick and overlap the glitter.  I then used a small dotting tool to put in ornaments with Sugar Sugar and Metallic Purple.  I also used Starry Blue's large blue glitters and placed them in random on each nail.  Last I used a medium dotting tool to make larger gold ornaments.  I covered each nail with Julep's Fast Drying topcoat.  Voila!  Cheesy (but cute and fun) Christmas Tree Nails.

*Tips* You could also use rhinestones or glitter to simulate Christmas lights.  I have some Sally Hansen Kaleidoscope glitter strips that would do awesome as glittler but it would be overkill with silver garland.  As with any marbling project, do not use fast drying polishes:)

What do do with nail art ideas?

I keep running into inspiration for nail art.  Ive been pinning ideas onto my Pinterest boards and drawing designs on slips of paper but its becoming a bit messy to keep up with all of those papers.  So this morning at the grocery store, I bought a pink, Five Star Fat Lil' Notebook to carry around in my purse. 


Cant wait to keep all my ideas tucked into one, small notebook:)  Now I gotta worry about how to decorate the cover!

Christmas Ribbon Candy Nails

Ive been playing a bit with marbling and dreamed up these nails while marbling on ziploc bags. 
In my quest for alternative Christmas nails (they can get pretty cheesy!) I thought that these nails would be a good but cheese-less design for the holidays!


Polishes Used:
Julep's Helena
Sally Hansen Hard as Nails The Real Teal
Revlon's Gold Coin
Julep's Fast Drying Topcoat

For these nails I simply painted my base coated nails with one half thick Real Teal and one half thick Helena.  Then using a stripper nail art brush, I painted a thin Gold Coin line down the middle of each nail.  I took a clean toothpick and quickly did swirls down the middle of the nail, dragging the gold polish into the teal and fuchsia polish.  I then waited for the nails to dry and applied a topcoat.

Pitfalls: 

Real Teal tend to dry very fast so you have to be faster or you end up with parts of the nail underneath showing!

Try to do the marbling in one fluid motion because if you try to go back, the design gets muddy.  Example is my index finger nail.


*Tips*

Since Real Teal tends to dry fast, I would recommend another greenish blue polish instead.  These nails would probably be excellent with some metallic green and red polish but again, I was looking for alternative holiday nails.  Let me know how it works for you!


Thursday, December 15, 2011

Alexander McQueen Rhinestone Skull Nails with Marbling

While surfing the fashion web, I couldn't help but notice and covet these awesome ballet flats from Alexander McQueen.  Isn't the rhinestone skull pretty insane?


Since I can't afford $545 shoes no matter how spectacular they are, I decided I needed to do some golden skull nails with rhinestone eyes and teeth.  I thought it would be overkill to do a skull on every nail so I also took this opportunity to try waterless marbling with black and gold polish on the rest of my nails.  I think I did pretty good for a first try!


Polishes Used:
Wet N' Wild Black Creme
Revlon Gold Coin
Julep Fast Drying Topcoat


After prepping my nails with a clear base coat, I applied one coat of Black Creme to each thumb nail.  I then quickly applied a diagonal slash of thick, black polish across the next nail and next to it I applied Gold Coin.  I took a toothpick and merged the polishes with a swirling motion.  As you can tell my first finger is a little muddier than I would like but the rest of my fingers turned out nice!  Next, once my thumb nails dried, I freehanded a gold skull on each nail.  I applied two black dots of polish to the skull and then applied a black rhinestone into each dot and then drew in a nose shape in black polish.  Last I added three, clear rhinestones for the teeth and applied a topcoat to each nail.

These nails would probably pop even more with a gold chrome polish but I haven't any of that kind of polish yet!  "Yet" being the opperative word.  Also, smaller rhinestones for the teeth might be in order or even specks of glitter?  Who knows.  These work for me & I hope you like them!

Liebster Blog Award

Thank you so much, Nails.N.Details, for nominating me for this award.  Its nice to know that someone cares about the little blogs out here just starting out!


"Liebster" is a German word, meaning dearest or beloved, but it can also mean favorite.  The idea behind the Liebster Blog Award is that it is given to bloggers who have less than 200 followers in order to create new connections and bring attention to these wonderful blogs!


The rules are as follows:

1. Thank the giver and link back to the blogger who gave it to you.
2. Reveal the five blogs you have chosen and let them know by leaving a comment on their blog.
3. Copy and paste the award onto your blog.
4. Request that people you have sent the award to forward it on to their favorite bloggers.
 My nominations:
4.  TBA
These are some great blogs.  Be sure to check them out and follow!

Sparkly Nude nails

Let me just say how much I'm digging the nude nail movement.  Still I think that nude nails always need something more.

Polishes Used:
Revlon's Grey Suede
Sephora by OPI Sparktacular topcoat


Do not be deceived by the polish name "Grey Suede."  This polish is actually a shimmery nude pink color.  I applied two coats of Grey Suede to my base coated nails.  After letting the polish dry, I applied Sparktacular topcoat with a cosmetic sponge to apply the glitter without a lot of the clear polish its mixed with.  I think these turned out nice and as understated as glitter nails can be.  A glitter gradient would be great with this polish too!

Tuesday, December 13, 2011

Teardrop rhinestones and Julep's Charlotte

I recently ordered Julep polish during a two for one sale and one of the polishes I bought was Julep's Charlotte. Charlotte is a light, airy purple and so very feminine.    I happen to adore purple polish and, since my name is Charlotte,  what is not to love?  I painted my nails this pretty purple but then thought...it needs something.  Obviously, this blog is not about polish swatches so I had to go the extra mile here on these nails.


Polishes used:
Julep's Charlotte
Revlon's Gold Coin
Julep's Fast Drying Topcoat
MASH Rain Drop Rhinestones*

These nails were very simple.  I painted my nails with two coats of Charlotte after applying a clear base coat.  I then uses a small nail art brush dipped in Gold Coin to paint a rain drop shape at the top middle of each nail.  I then applied a small amount of an old topcoat I had (that has dried out and thicken a bit) to each rain drop shape and applied five different colors of tear drop rhinestones to each hand.  Loving the rhinestones and Julep's Charlotte.  Now what to wear to show off these nails!

*Tip*  If you have a steady hand, you might try doing the gold surrounding each rhinestones after you've glued them to your nail, especially if you think you might make the gold raindrop smaller than the rhinestone.  You want the gold polish to appear like the rhinestone is set in gold.  There is no set way to do this but without a steady hand you are better off free-handing the larger gold rain drop first and then applying the rhinestone.  Good luck!


*You can get a great deal on rain drop rhinestones here.  These are the exact kind that I used on the nails above and for $2.99, you'll be be-dazzling tons of nails for pennies!